Lily
-
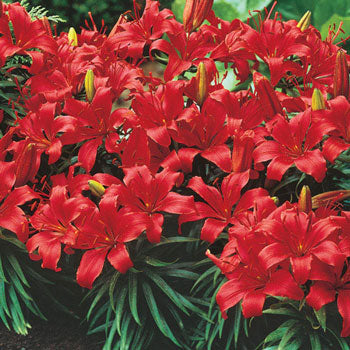
GardenerStar Carpet Border Lily
Botanical Name: Lilium asiatic & oriental Form: Bulb Hardiness Zone: 3-8 Flowering Time: Early to midsummer Light Requirements: Full Sun. Partial Shade Flower Color: Collection. see individual varieties Flower Form: Typical asiatic and oriental forms Foliage Type: Linear green leaves and narrow long lance-shaped. Growth Rate: Medium Height/Habit: 10 - 20 inches Spread: 9 - 15 inches Planting Instructions: 6" deep and 9 - 15" apart Soil Requirements: Prefers well drained soil. but will tolerate heavier soils. Will Tolerate: Acidic Soil. Clay Soil. Loamy Soil. Sandy Soil Pruning: Don't remove leaves until they have died down in fall. They help provide nourishment to the bulb for next season's blooms.
$6.99
-
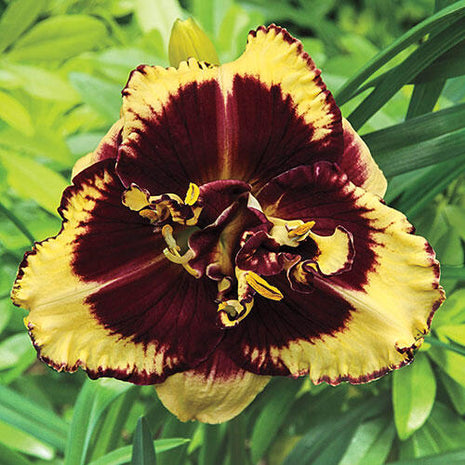
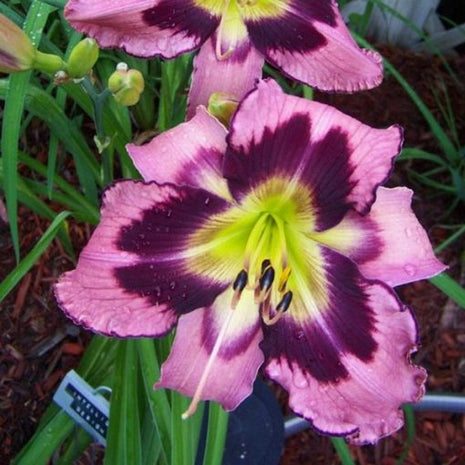
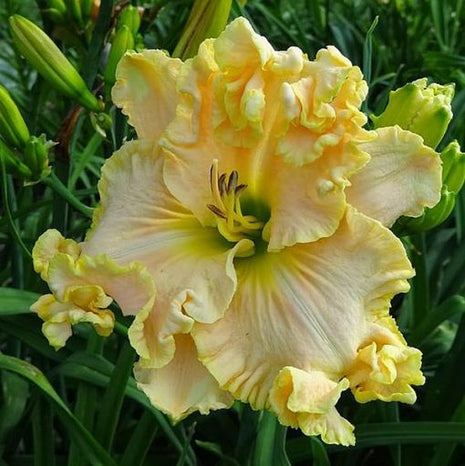
GardenerStar Tiger Blood Reblooming Daylily
Large. attractive 2-tone flowers that rebloom.Bears trumpet-shaped. cream-yellow. 5" yellow flowers of heavy substance with a large deep red eye zone and edging. Blooms in early summer and again later in the season. Goes completely dormant during winter. This butterfly attractor is great in gardens. rockeries and containers. and is an excellent cut flower. Introduced in 2012. Botanical Name: Hemerocallis 'Tiger Blood' Form: Perennial Hardiness Zone: 3-9 Flowering Time: Midsummer (Early to midseason) Light Requirements: Full Sun. Partial Shade Flower Color: Cream with great dark red eye and edge Flower Form: 7" trumpet shaped flowers Foliage Type: Dormant grass-like. long. linear. rich green foliage Growth Rate: Medium Height/Habit: 26 inches Spread: 24 inches Planting Instructions: Dig a hole deep enough to accommodate the roots without bending them. Roots should be just below the soil surface with the crown at the soil level. Soil Requirements: Well drained Will Tolerate: Acidic Soil. Clay Soil. Loamy Soil. Sandy Soil Pruning: Cut back spent flower stems after flowering.
$6.99
-
GardenerStar Daylily Hybrid Flowers Seed
Make Your Seed to Garden 1. Choose the right containers You can start seeds in almost any type of container. as long as it's at least 2-3 ” deep and has some drainage holes. If you love to DIY by yourself. you might start growing seedlings in yogurt cups. milk cartons or even a paper cup. 2. The “potting soil” Choose the potting soil that's made for growing seedlings. NOTE: Do not use soil from your garden or re-use potting soil from your houseplants. Start with a fresh. sterile mix that will ensure healthy. disease-free seedlings. 3. Planting Some of the small ones can be sprinkled right on the soil surface. Larger seeds will need to be buried. After planting seeds. you have to moisten the newly planted seeds. To speed up germination. cover the pots with wet paper or a plastic dome. This helps keep the seeds moist before they germinate. When you see the first signs of green. you have to remove the cover. 4. Watering. feeding. repeating As the seedlings grow up. you have to keep the soil moist but not soggy. Let the soil dry slightly between waterings. Remember to feed the seedlings regularly with liquid fertilizer. 5. Light Seeds need a lot of light. Set the lights on a timer for 15 hours a day. If you're growing in a window. choose a south-facing exposure. Rotate the pots regularly to keep plants from leaning into the light. If you're growing under lights. adjust them so they're just a few inches above the tops of the seedlings. Keep in mind that seedlings need darkness. too. so they can rest. As the seedlings grow taller. raise the lights. 6. Move to outdoors It's not a good idea to move your seedlings directly from the protected environment of your home into the garden. You've been coddling these seedlings for weeks. so they need a gradual transition to the great outdoors. About a week before you plan to set the seedlings into the garden. place them in a protected spot outdoors (partly shaded. out of the wind) for a few hours. bringing them in at night. Gradually. over the course of a week or 10 days. expose them to more and more sunshine and wind. A cold frame is a great place to harden off plants.
$5.99
-
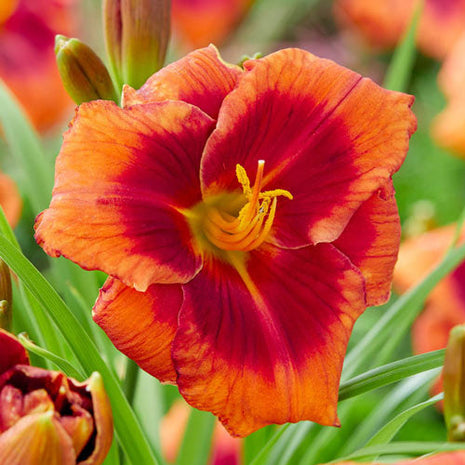
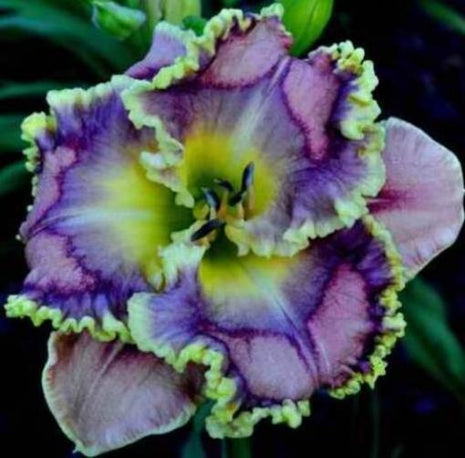
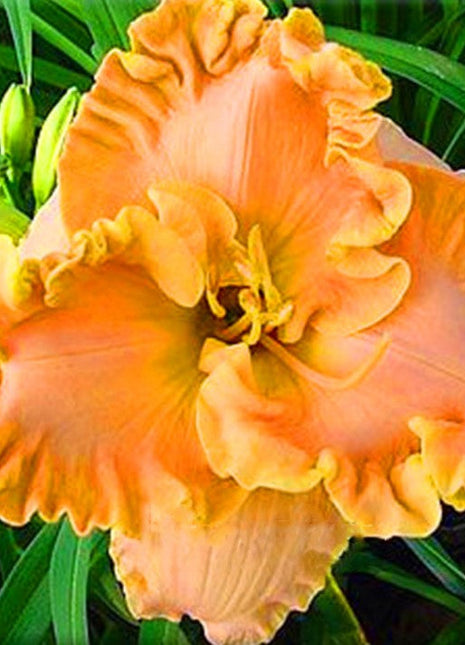
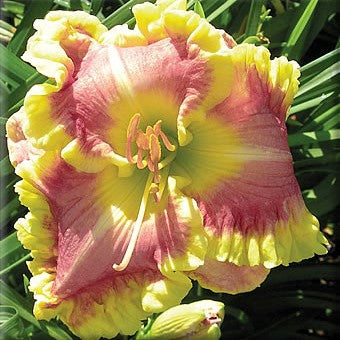
GardenerStar Frank Smith Reblooming Daylily
Extra-early blooms begin the season with a bang!Beautifully formed. 5" daylilies in a bold shade of orange feature a striking red eye zone and yellow to green throat. It appears in the landscape earlier than most daylilies. A light fragrance attracts butterflies and gives you one more reason to frequent the garden—as if you needed one. Botanical Name: Hemerocallis 'Frank Smith' Form: Root Hardiness Zone: 3-9 Flowering Time: Early season and again in late summer to early fall. (Late spring. and again in late summer to early fall.) Light Requirements: Full Sun. Partial Shade Flower Color: Orange with a brilliant red eyezone and a yellow to green throat Flower Form: 5" single flower. Tetraploid. Foliage Type: Evergreen grass-like. linear foliage. Growth Rate: Medium Height/Habit: 24 inches Spread: 18 - 24 inches Planting Instructions: Dig a hole deep enough to accommodate the roots without bending them. Roots should be just below the soil surface with the crown at the soil level. Soil Requirements: Well drained Will Tolerate: Acidic Soil. Clay Soil. Loamy Soil. Sandy Soil Pruning: Cut back spent flower stems after flowering.
$6.99
-
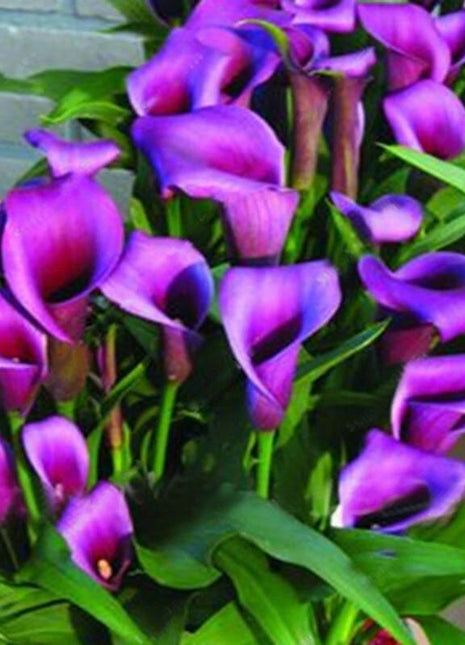
Meicco Egrow 50 PCS Calla Lily Seeds Garden Balcony Potted Perennial Flower Seeds Bonsai Ivy Flowers
Description :Egrow 50 PCS Calla Lily Seeds Garden Balcony Potted Perennial Flower Seeds Bonsai Ivy FlowersCalla Lily Seed like warm. sunny and humid climate.No strict requirements on the soil. it's easy to cultivation and management. also can be exposed to winter.Specifications :Germination time : 5-7 Days Germination temperature : 15-20℃Color : Purple. Red. Yellow. OriangeWeight : 0.02 kg Applications : Farm. Balcony. Roof. Garden. Patio. etc. Tips :Soaked in warm water for 8 hours before planting will be better if the seeds is over 0.5mm.Because the seeds are in dormant state and need to absorb enough water to germination.Package included :1 x 50 PCS Egrow Calla Lily SeedsProduct Details :
$12.99 $7.99
-
GardenerStar Daylily Hybrid Flowers Seed
Make Your Seed to Garden 1. Choose the right containers You can start seeds in almost any type of container. as long as it's at least 2-3 ” deep and has some drainage holes. If you love to DIY by yourself. you might start growing seedlings in yogurt cups. milk cartons or even a paper cup. 2. The “potting soil” Choose the potting soil that's made for growing seedlings. NOTE: Do not use soil from your garden or re-use potting soil from your houseplants. Start with a fresh. sterile mix that will ensure healthy. disease-free seedlings. 3. Planting Some of the small ones can be sprinkled right on the soil surface. Larger seeds will need to be buried. After planting seeds. you have to moisten the newly planted seeds. To speed up germination. cover the pots with wet paper or a plastic dome. This helps keep the seeds moist before they germinate. When you see the first signs of green. you have to remove the cover. 4. Watering. feeding. repeating As the seedlings grow up. you have to keep the soil moist but not soggy. Let the soil dry slightly between waterings. Remember to feed the seedlings regularly with liquid fertilizer. 5. Light Seeds need a lot of light. Set the lights on a timer for 15 hours a day. If you're growing in a window. choose a south-facing exposure. Rotate the pots regularly to keep plants from leaning into the light. If you're growing under lights. adjust them so they're just a few inches above the tops of the seedlings. Keep in mind that seedlings need darkness. too. so they can rest. As the seedlings grow taller. raise the lights. 6. Move to outdoors It's not a good idea to move your seedlings directly from the protected environment of your home into the garden. You've been coddling these seedlings for weeks. so they need a gradual transition to the great outdoors. About a week before you plan to set the seedlings into the garden. place them in a protected spot outdoors (partly shaded. out of the wind) for a few hours. bringing them in at night. Gradually. over the course of a week or 10 days. expose them to more and more sunshine and wind. A cold frame is a great place to harden off plants.
$5.99
-
GardenerStar Daylily Hybrid Flowers Seeds
Make Your Seed to Garden 1. Choose the right containers You can start seeds in almost any type of container. as long as it's at least 2-3 ” deep and has some drainage holes. If you love to DIY by yourself. you might start growing seedlings in yogurt cups. milk cartons or even a paper cup. 2. The “potting soil” Choose the potting soil that's made for growing seedlings. NOTE: Do not use soil from your garden or re-use potting soil from your houseplants. Start with a fresh. sterile mix that will ensure healthy. disease-free seedlings. 3. Planting Some of the small ones can be sprinkled right on the soil surface. Larger seeds will need to be buried. After planting seeds. you have to moisten the newly planted seeds. To speed up germination. cover the pots with wet paper or a plastic dome. This helps keep the seeds moist before they germinate. When you see the first signs of green. you have to remove the cover. 4. Watering. feeding. repeating As the seedlings grow up. you have to keep the soil moist but not soggy. Let the soil dry slightly between waterings. Remember to feed the seedlings regularly with liquid fertilizer. 5. Light Seeds need a lot of light. Set the lights on a timer for 15 hours a day. If you're growing in a window. choose a south-facing exposure. Rotate the pots regularly to keep plants from leaning into the light. If you're growing under lights. adjust them so they're just a few inches above the tops of the seedlings. Keep in mind that seedlings need darkness. too. so they can rest. As the seedlings grow taller. raise the lights. 6. Move to outdoors It's not a good idea to move your seedlings directly from the protected environment of your home into the garden. You've been coddling these seedlings for weeks. so they need a gradual transition to the great outdoors. About a week before you plan to set the seedlings into the garden. place them in a protected spot outdoors (partly shaded. out of the wind) for a few hours. bringing them in at night. Gradually. over the course of a week or 10 days. expose them to more and more sunshine and wind. A cold frame is a great place to harden off plants.
$5.99
-
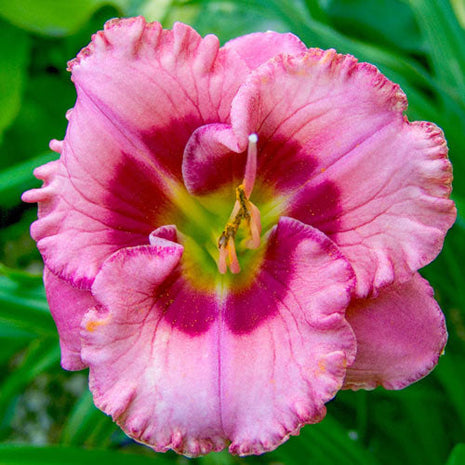
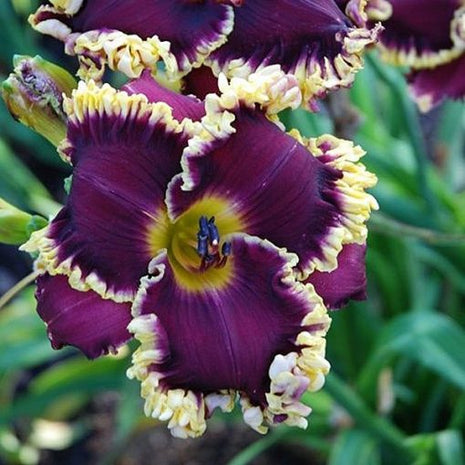
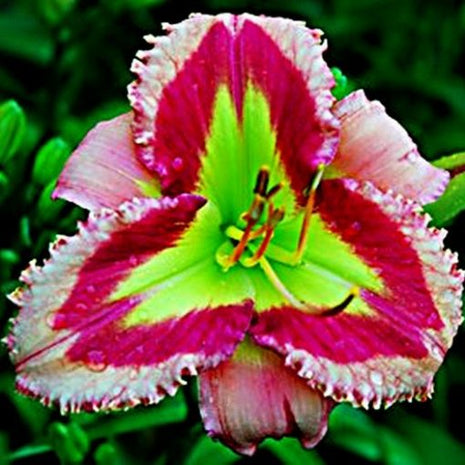
GardenerStar Cherry Valentine Reblooming Daylily
Gorgeous. floriferous and fragrant rebloomer!Each day is Valentine's Day when this plant's romantic-looking. bright pink with crimson red flowers are in bloom. With a stem that bears 30 buds on its three stems. you'll get lots of 4" flowers of bright pink with a crimson-red eye zone surrounding a green throat. A red edge beautifully outlines each bloom. Botanical Name: Hemerocallis 'Cherry Valentine' Form: Root (perennial) Hardiness Zone: 3-9 Flowering Time: Early season and again in late summer to early fall. Light Requirements: Full Sun. Partial Shade Flower Color: Bright pink with crimson red eyezone above green throat Flower Form: 4" single flower. Tetraploid. Foliage Type: Evergreen grass-like. linear foliage. Growth Rate: Medium Height/Habit: 28 inches Spread: 24 inches Planting Instructions: Soak roots for half an hour in cold to luke warm water. Dig a hole deep enough to accommodate the roots without bending them. Plant with the crown (sprouts) just below soil level. Soil Requirements: Well drained Will Tolerate: Acidic Soil. Clay Soil. Loamy Soil. Sandy Soil Pruning: Cut back spent flower stems after flowering.
$6.99
-
Jack Seeds White Lily Calendula Flower Seeds
Grow your own flowers with these 100 pcs of White Lily Calendula Flower Seeds. Each pack contains 100 seeds. Highlights: Product Type: Bonsai Size: Small.Mini.Large.Medium Climate: Temperate Style: Perennial Applicable Constellation: Aries Flowerpot: Excluded Classification: Novel Plant Full-bloom Period: Spring Use: Outdoor Plants Cultivating Difficulty Degree: Regular Model Number: other Function: Formaldehyde Removing Location: Courtyard Type: Blooming Plants Variety: Calendula officinalis Shipping & DeliveryAll orders are shipped within 1 to 7 days of you placing the order using DHL eCommerce. USPS or ePacket depending on your location and fastest available service. Typical delivery time frame is between 11 to 18 business days however. you may receive your items much earlier. All orders are shipped with tracking number so you can track it every step of the way! Packages may be faced with delays beyond our control such as customs or postal delays.
$7.99 - $9.99
-
GardenerStar Daylily Hybrid Flowers Seed
Make Your Seed to Garden 1. Choose the right containers You can start seeds in almost any type of container. as long as it's at least 2-3 ” deep and has some drainage holes. If you love to DIY by yourself. you might start growing seedlings in yogurt cups. milk cartons or even a paper cup. 2. The “potting soil” Choose the potting soil that's made for growing seedlings. NOTE: Do not use soil from your garden or re-use potting soil from your houseplants. Start with a fresh. sterile mix that will ensure healthy. disease-free seedlings. 3. Planting Some of the small ones can be sprinkled right on the soil surface. Larger seeds will need to be buried. After planting seeds. you have to moisten the newly planted seeds. To speed up germination. cover the pots with wet paper or a plastic dome. This helps keep the seeds moist before they germinate. When you see the first signs of green. you have to remove the cover. 4. Watering. feeding. repeating As the seedlings grow up. you have to keep the soil moist but not soggy. Let the soil dry slightly between waterings. Remember to feed the seedlings regularly with liquid fertilizer. 5. Light Seeds need a lot of light. Set the lights on a timer for 15 hours a day. If you're growing in a window. choose a south-facing exposure. Rotate the pots regularly to keep plants from leaning into the light. If you're growing under lights. adjust them so they're just a few inches above the tops of the seedlings. Keep in mind that seedlings need darkness. too. so they can rest. As the seedlings grow taller. raise the lights. 6. Move to outdoors It's not a good idea to move your seedlings directly from the protected environment of your home into the garden. You've been coddling these seedlings for weeks. so they need a gradual transition to the great outdoors. About a week before you plan to set the seedlings into the garden. place them in a protected spot outdoors (partly shaded. out of the wind) for a few hours. bringing them in at night. Gradually. over the course of a week or 10 days. expose them to more and more sunshine and wind. A cold frame is a great place to harden off plants.
$5.99
-

GardenerStar Tiger Blood Reblooming Daylily
Large. attractive 2-tone flowers that rebloom.Bears trumpet-shaped. cream-yellow. 5" yellow flowers of heavy substance with a large deep red eye zone and edging. Blooms in early summer and again later in the season. Goes completely dormant during winter. This butterfly attractor is great in gardens. rockeries and containers. and is an excellent cut flower. Introduced in 2012. Botanical Name: Hemerocallis 'Tiger Blood' Form: Perennial Hardiness Zone: 3-9 Flowering Time: Midsummer (Early to midseason) Light Requirements: Full Sun. Partial Shade Flower Color: Cream with great dark red eye and edge Flower Form: 7" trumpet shaped flowers Foliage Type: Dormant grass-like. long. linear. rich green foliage Growth Rate: Medium Height/Habit: 26 inches Spread: 24 inches Planting Instructions: Dig a hole deep enough to accommodate the roots without bending them. Roots should be just below the soil surface with the crown at the soil level. Soil Requirements: Well drained Will Tolerate: Acidic Soil. Clay Soil. Loamy Soil. Sandy Soil Pruning: Cut back spent flower stems after flowering.
$5.99
-

GardenerStar Daylily Hybrid Flowers Seed
Make Your Seed to Garden 1. Choose the right containers You can start seeds in almost any type of container. as long as it's at least 2-3 ” deep and has some drainage holes. If you love to DIY by yourself. you might start growing seedlings in yogurt cups. milk cartons or even a paper cup. 2. The “potting soil” Choose the potting soil that's made for growing seedlings. NOTE: Do not use soil from your garden or re-use potting soil from your houseplants. Start with a fresh. sterile mix that will ensure healthy. disease-free seedlings. 3. Planting Some of the small ones can be sprinkled right on the soil surface. Larger seeds will need to be buried. After planting seeds. you have to moisten the newly planted seeds. To speed up germination. cover the pots with wet paper or a plastic dome. This helps keep the seeds moist before they germinate. When you see the first signs of green. you have to remove the cover. 4. Watering. feeding. repeating As the seedlings grow up. you have to keep the soil moist but not soggy. Let the soil dry slightly between waterings. Remember to feed the seedlings regularly with liquid fertilizer. 5. Light Seeds need a lot of light. Set the lights on a timer for 15 hours a day. If you're growing in a window. choose a south-facing exposure. Rotate the pots regularly to keep plants from leaning into the light. If you're growing under lights. adjust them so they're just a few inches above the tops of the seedlings. Keep in mind that seedlings need darkness. too. so they can rest. As the seedlings grow taller. raise the lights. 6. Move to outdoors It's not a good idea to move your seedlings directly from the protected environment of your home into the garden. You've been coddling these seedlings for weeks. so they need a gradual transition to the great outdoors. About a week before you plan to set the seedlings into the garden. place them in a protected spot outdoors (partly shaded. out of the wind) for a few hours. bringing them in at night. Gradually. over the course of a week or 10 days. expose them to more and more sunshine and wind. A cold frame is a great place to harden off plants.
$5.99
-
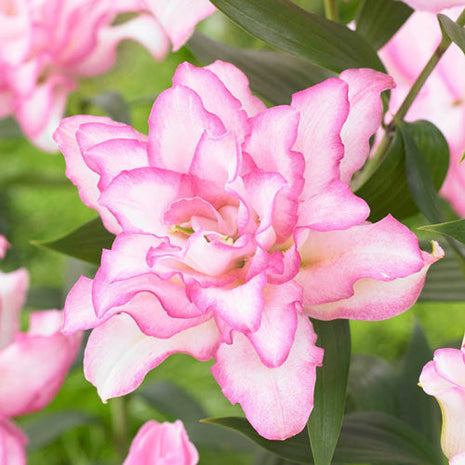
GardenerStar Anouska Roselily
Perfect. pollen-free garden performer!Fully double. white blooms tinged with pink boast wide. pink edges along each petal. You'll have plenty of flowers to enjoy in clean. pollen-free. lightly fragrant bouquets. Attracts butterflies to midsummer borders. feature beds and container gardens alike. Perennializes well. so leave the bulbs undisturbed. Lilium oriental Botanical NameLilium oriental 'Anouska' FormPerennial Hardiness Zone3-8 Flowering TimeMidsummer Light RequirementsFull Sun. Partial Shade Flower ColorWhite flowers with a hint of pink and a large pink-edge. Flower FormDouble flowers. approx. 6" in diameter. Foliage TypeLinear. glossy green leaves arranged in whorls or spirals up erect stems. Growth RateMedium Height/Habit28 inches Spread12 - 15 inches Planting Instructions6" deep and 12 - 15" apart Soil RequirementsPrefers well drained soil. but will tolerate heavier soils. Will TolerateAcidic Soil. Clay Soil. Loamy Soil. Sandy Soil PruningDon't remove leaves until they have died down in fall. They help provide nourishment to the bulb for next season's blooms.
$6.99 - $11.99
-

GardenerStar Daylily Hybrid Flowers Seed
Make Your Seed to Garden 1. Choose the right containers You can start seeds in almost any type of container. as long as it's at least 2-3 ” deep and has some drainage holes. If you love to DIY by yourself. you might start growing seedlings in yogurt cups. milk cartons or even a paper cup. 2. The “potting soil” Choose the potting soil that's made for growing seedlings. NOTE: Do not use soil from your garden or re-use potting soil from your houseplants. Start with a fresh. sterile mix that will ensure healthy. disease-free seedlings. 3. Planting Some of the small ones can be sprinkled right on the soil surface. Larger seeds will need to be buried. After planting seeds. you have to moisten the newly planted seeds. To speed up germination. cover the pots with wet paper or a plastic dome. This helps keep the seeds moist before they germinate. When you see the first signs of green. you have to remove the cover. 4. Watering. feeding. repeating As the seedlings grow up. you have to keep the soil moist but not soggy. Let the soil dry slightly between waterings. Remember to feed the seedlings regularly with liquid fertilizer. 5. Light Seeds need a lot of light. Set the lights on a timer for 15 hours a day. If you're growing in a window. choose a south-facing exposure. Rotate the pots regularly to keep plants from leaning into the light. If you're growing under lights. adjust them so they're just a few inches above the tops of the seedlings. Keep in mind that seedlings need darkness. too. so they can rest. As the seedlings grow taller. raise the lights. 6. Move to outdoors It's not a good idea to move your seedlings directly from the protected environment of your home into the garden. You've been coddling these seedlings for weeks. so they need a gradual transition to the great outdoors. About a week before you plan to set the seedlings into the garden. place them in a protected spot outdoors (partly shaded. out of the wind) for a few hours. bringing them in at night. Gradually. over the course of a week or 10 days. expose them to more and more sunshine and wind. A cold frame is a great place to harden off plants.
$5.99
-
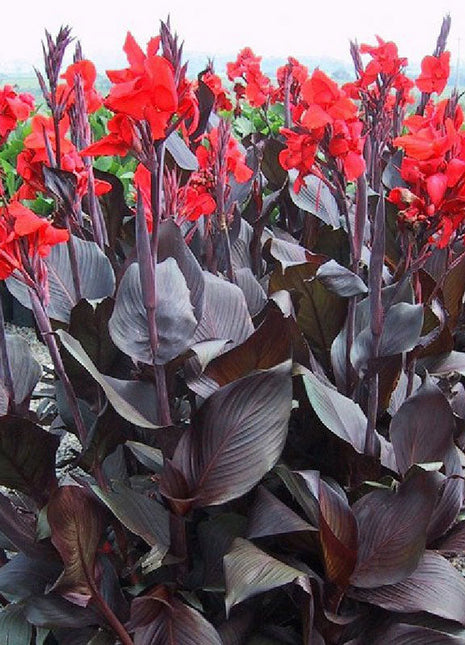
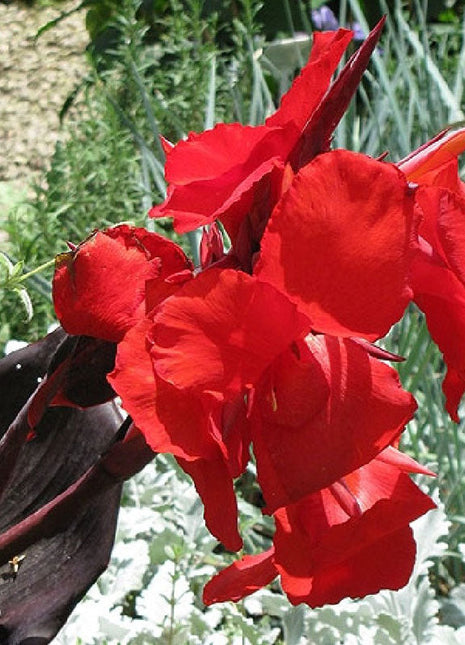
My Store Canna Lily Flower Seeds Perennial Beautiful Bonsai Plant
🪴We are committed to providing our customers with quality. affordable seeds. 🌱 💵 Payments Via PayPal® 😍 99.3% of customers buy 20 Seeds(20% Off) or more to share with family or friends ✨Priority is given to delivery after payment ✈ Worldwide Express Shipping Available Canna Lily Flower Seeds Perennial Beautiful Bonsai Plant A shade-tolerant scarlet lily contrasted by dark foliage Tall. fast-growing perennial with striking foliage A late-summer bloomer with reddish-orange blooms and beautiful dark foliage Thrives in bright. sunny growing areas One of the impressive and eye-catching extra tall Canna Lily varieties. Australia is a tropical beauty with dark foliage and bold vermillion blooms. Canna Lilies are warm weather lovers! While tolerant of partial shade. they thrive in the sun! Winter Hardy in warmer zones. be sure to plant once soil and nighttime temperatures are consistently warm. Attracts Bees. Attracts Butterflies. Attracts Hummingbirds. Attracts Pollinators. Easy to Grow & Maintain. Fast Growing. Fragrant All of my seeds are tested and guaranteed. Most of my seeds are fresh off of my own plants. Our Guarantee We truly believe we carry some of the most innovative products in the world. and we want to make sure we back that up with a risk-free 90-day guarantee. If you don't have a positive experience for ANY reason. we will do WHATEVER it takes to make sure you are 100% satisfied with your purchase. Buying items online can be a daunting task. so we want you to realize that there is absolutely ZERO risks in buying something and trying it out. If you don't like it. no hard feelings we'll make it right. We have 24/7/365 Ticket and Email Support. Please contact us if you need assistance.
$7.99 - $11.99
-
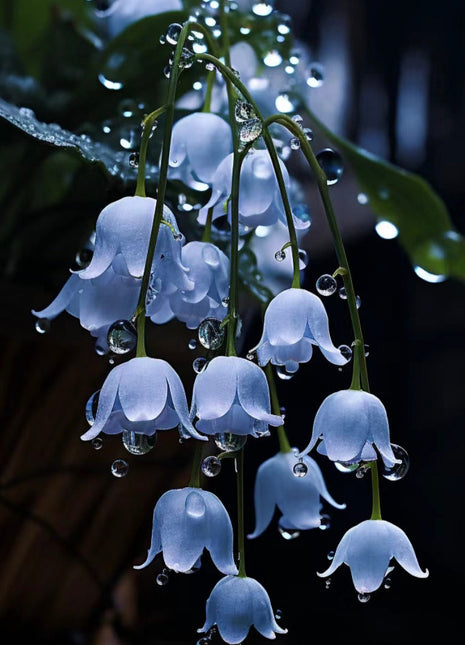
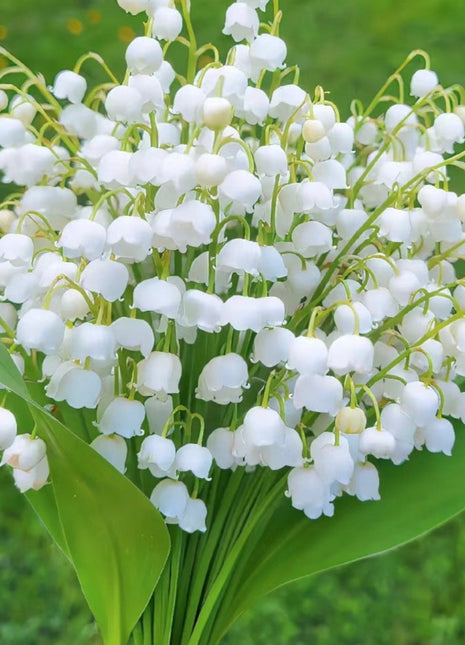
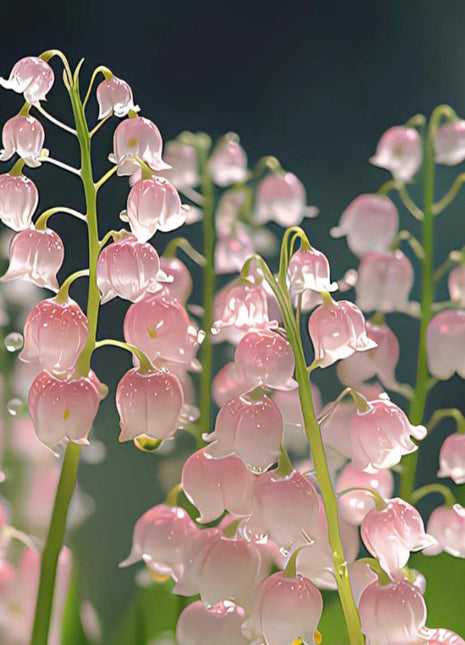
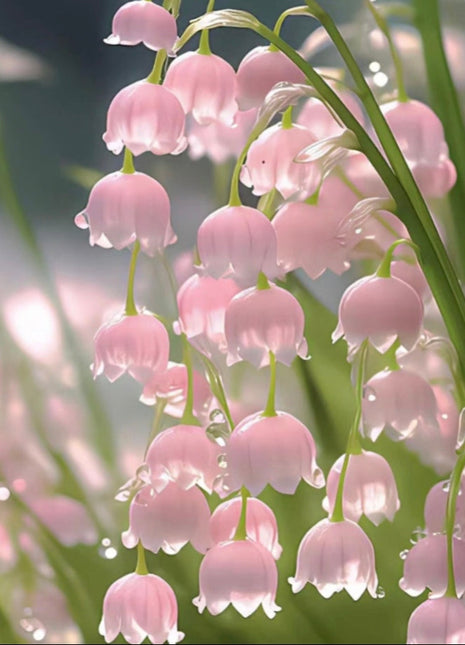
My Store Blue lily of the valley-Symbol of gratitude and everlasting love
🪴We are committed to providing our customers with quality. affordable seeds. 🌱 💵 Payments Via PayPal® 😍 99.3% of customers buy 100 Seeds(15% Off) or more to share with family or friends ✨Priority is given to delivery after payment ✈ Worldwide Express Shipping Available Lily of the Valley. scientifically known as Convallaria majalis. is a charming and fragrant perennial plant. Here are some of its distinctive characteristics and tips for planting: 1.Habit: Lily of the Valley is a low-growing plant with lush. dark green. lance-shaped leaves. Its delicate. bell-shaped white flowers hang gracefully from arching stems. exuding a sweet and enchanting fragrance. 2.Light and Soil: Lily of the Valley thrives in partial to full shade and prefers moist. well-draining soil enriched with organic matter. 3.Watering: Keep the soil consistently moist but avoid waterlogging. Regular watering is essential. especially during dry periods. 4.Planting: To plant Lily of the Valley. select a shady spot in your garden or under deciduous trees. Loosen the soil and remove any weeds. Plant the rhizomes. or underground stems. at a depth of about 2-3 inches and space them about 6 inches apart. Water thoroughly after planting. 5.Propagation: Lily of the Valley spreads through rhizomes. creating lovely colonies over time. Once established. it requires minimal care. 6.Landscaping: Lily of the Valley makes an excellent addition to shade gardens. woodland areas. and as a charming ground cover under trees. Features: Floral Delight: The fragrant blossoms of Lily of the Valley are also used in bouquets and floral arrangements. making them a delightful gift option. Package Includes:1 Pack of Strawberry Hydrangea Flowers Seeds (about 50pcs or 100pcs or 200pcs) ♻️14 Days Easy Return & ExchangeItems can be returned or exchanged within 14 days from the delivered day. AFTER-SALE SERVICE Shipping - Worldwide Express Shipping is available Returns>> Fast refund.100% Money Back Guarantee. If for whatever reason you're not completely satisfied. then return the product within 90 days. AT Our Store. WE HAVE STRONGLY CONFIDENCE ON OUR PRODUCTS. EVERY PRODUCT INCLUDES A 24-MONTH. WORRY-FREE GUARANTEE. IF YOU HAVE ANY PROBLEM OR SUGGESTION. PLEASE CONTACT US FREELY. WE WILL PROVIDE FRIENDLY SUPPORT FOR YOU IN 24 HR.
$8.99 - $22.99
-
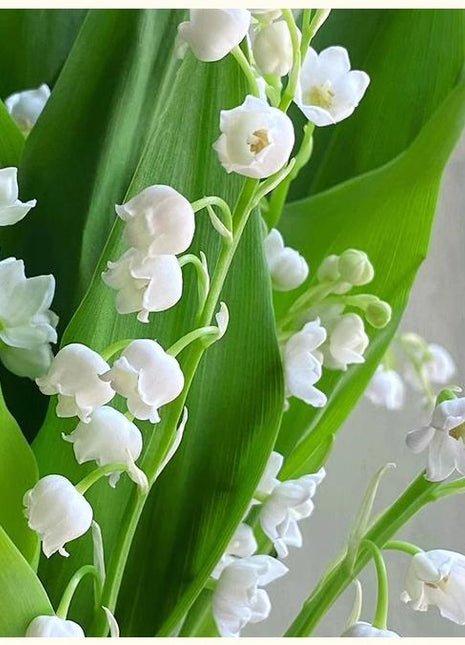
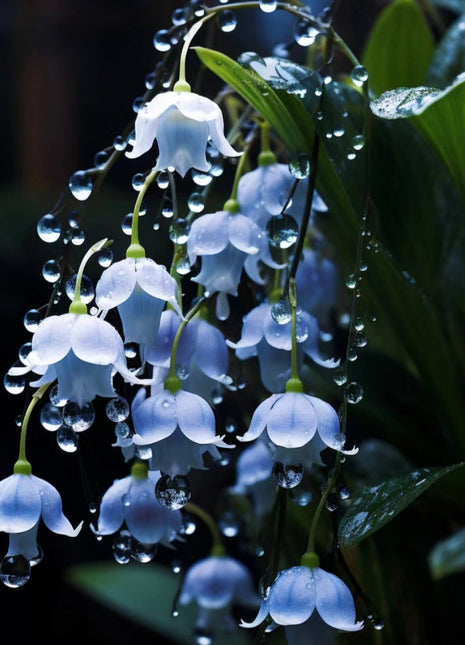
My Store White lily of the valley-Waiting for happiness
🪴We are committed to providing our customers with quality. affordable seeds. 🌱 💵 Payments Via PayPal® 😍 99.3% of customers buy 100 Seeds(15% Off) or more to share with family or friends ✨Priority is given to delivery after payment ✈ Worldwide Express Shipping Available Lily of the Valley. scientifically known as Convallaria majalis. is a charming and fragrant perennial plant. Here are some of its distinctive characteristics and tips for planting: 1.Habit: Lily of the Valley is a low-growing plant with lush. dark green. lance-shaped leaves. Its delicate. bell-shaped white flowers hang gracefully from arching stems. exuding a sweet and enchanting fragrance. 2.Light and Soil: Lily of the Valley thrives in partial to full shade and prefers moist. well-draining soil enriched with organic matter. 3.Watering: Keep the soil consistently moist but avoid waterlogging. Regular watering is essential. especially during dry periods. 4.Planting: To plant Lily of the Valley. select a shady spot in your garden or under deciduous trees. Loosen the soil and remove any weeds. Plant the rhizomes. or underground stems. at a depth of about 2-3 inches and space them about 6 inches apart. Water thoroughly after planting. 5.Propagation: Lily of the Valley spreads through rhizomes. creating lovely colonies over time. Once established. it requires minimal care. 6.Landscaping: Lily of the Valley makes an excellent addition to shade gardens. woodland areas. and as a charming ground cover under trees. Features: Floral Delight: The fragrant blossoms of Lily of the Valley are also used in bouquets and floral arrangements. making them a delightful gift option. Package Includes:1 Pack of Strawberry Hydrangea Flowers Seeds (about 50pcs or 100pcs or 200pcs) ♻️14 Days Easy Return & ExchangeItems can be returned or exchanged within 14 days from the delivered day. AFTER-SALE SERVICE Shipping - Worldwide Express Shipping is available Returns>> Fast refund.100% Money Back Guarantee. If for whatever reason you're not completely satisfied. then return the product within 90 days. AT Our Store. WE HAVE STRONGLY CONFIDENCE ON OUR PRODUCTS. EVERY PRODUCT INCLUDES A 24-MONTH. WORRY-FREE GUARANTEE. IF YOU HAVE ANY PROBLEM OR SUGGESTION. PLEASE CONTACT US FREELY. WE WILL PROVIDE FRIENDLY SUPPORT FOR YOU IN 24 HR.
$7.99 - $22.99
-
My Store Lily of the Valley Seeds
🪴We are committed to providing our customers with quality. affordable seeds. 🌱 💵 Payments Via PayPal® 😍 99.3% of customers buy 100 Seeds(15% Off) or more to share with family or friends ✨Priority is given to delivery after payment ✈ Worldwide Express Shipping Available Lily of the Valley. scientifically known as Convallaria majalis. is a charming and fragrant perennial plant. Here are some of its distinctive characteristics and tips for planting: 1.Habit: Lily of the Valley is a low-growing plant with lush. dark green. lance-shaped leaves. Its delicate. bell-shaped white flowers hang gracefully from arching stems. exuding a sweet and enchanting fragrance. 2.Light and Soil: Lily of the Valley thrives in partial to full shade and prefers moist. well-draining soil enriched with organic matter. 3.Watering: Keep the soil consistently moist but avoid waterlogging. Regular watering is essential. especially during dry periods. 4.Planting: To plant Lily of the Valley. select a shady spot in your garden or under deciduous trees. Loosen the soil and remove any weeds. Plant the rhizomes. or underground stems. at a depth of about 2-3 inches and space them about 6 inches apart. Water thoroughly after planting. 5.Propagation: Lily of the Valley spreads through rhizomes. creating lovely colonies over time. Once established. it requires minimal care. 6.Landscaping: Lily of the Valley makes an excellent addition to shade gardens. woodland areas. and as a charming ground cover under trees. Features: Floral Delight: The fragrant blossoms of Lily of the Valley are also used in bouquets and floral arrangements. making them a delightful gift option. Package Includes:1 Pack of Strawberry Hydrangea Flowers Seeds (about 50pcs or 100pcs or 200pcs) ♻️14 Days Easy Return & ExchangeItems can be returned or exchanged within 14 days from the delivered day. AFTER-SALE SERVICE Shipping - Worldwide Express Shipping is available Returns>> Fast refund.100% Money Back Guarantee. If for whatever reason you're not completely satisfied. then return the product within 90 days. AT Our Store. WE HAVE STRONGLY CONFIDENCE ON OUR PRODUCTS. EVERY PRODUCT INCLUDES A 24-MONTH. WORRY-FREE GUARANTEE. IF YOU HAVE ANY PROBLEM OR SUGGESTION. PLEASE CONTACT US FREELY. WE WILL PROVIDE FRIENDLY SUPPORT FOR YOU IN 24 HR.
$8.99 - $22.99
-
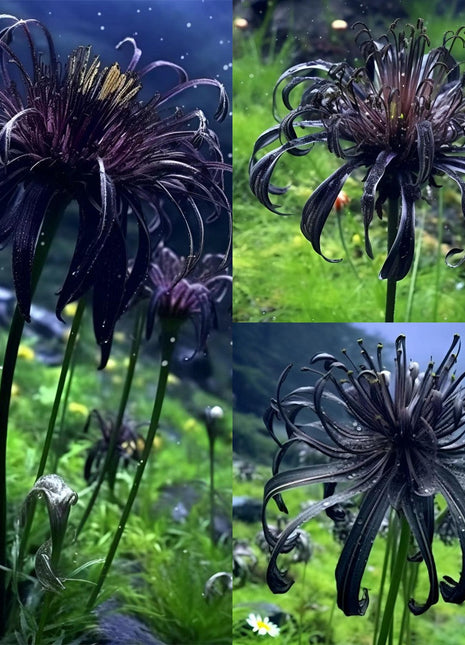
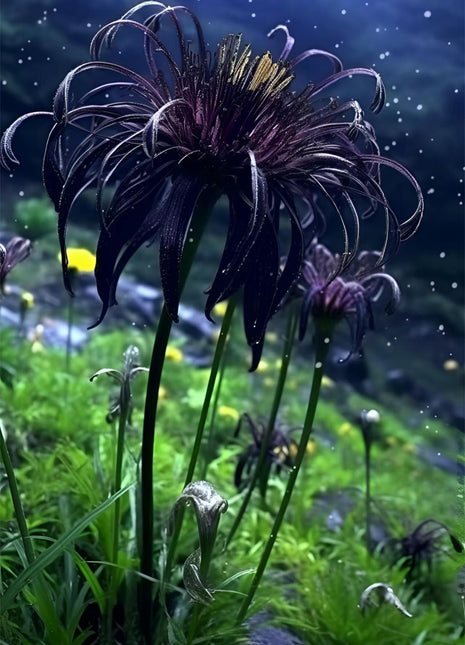
mysite 🖤Black Spider Lily
🌺Bringing Blooms Closer to Your World: We Will Offer Affordable And High-Quality Seeds for You. 💵 Payments Via PayPal® 😍 99.3% of customers Buy 3 get 1 Free or more to share with family or friends ✨Priority is given to delivery after payment ✈ Worldwide Express Shipping Available 🕷️ Welcome to the World of Black Spider Lily! Discover the perfect blend of mystery and elegance. Black Spider Lily is not just a flower. but the beginning of a story. 🌸✨ 🌷 Product Highlights: Unique Beauty: Each petal exudes a deep black. like pearls in a starry night.Resilient Life: Black Spider Lily symbolizes the resilience of life. blooming with a unique glow in the dark.Work of Art: Each bouquet is meticulously designed. presenting an unparalleled visual feast. 🌼 Why Choose Black Spider Lily: One of a Kind: A different language of flowers. conveying your distinct taste.Precious Collection: The rare Black Spider Lily will become a treasure in your garden.Gift of Choice: Present it to your loved ones. conveying emotions that stand out. Planting Conditions: Sunlight: Black Spider Lily thrives in partial to full sun. It prefers a location with direct sunlight in the morning and some shade during the hottest part of the day. Soil: Well-draining soil is crucial to prevent waterlogging. as the bulbs are prone to rot. A slightly acidic to neutral soil pH is ideal. Watering: During its active growing season in spring and fall. keep the soil evenly moist. However. once the foliage dies back. reduce watering to allow the bulbs to rest. Temperature: Black Spider Lily is hardy in USDA zones 7 to 10. It requires a period of dormancy during winter. so it's important to provide a cold period for the bulbs. Spacing: When planting bulbs. place them about 6 to 8 inches (15 to 20 cm) apart and at a depth of around 4 to 6 inches (10 to 15 cm). Fertilization: Fertilize the bulbs in early spring before they start actively growing. using a balanced. slow-release fertilizer. Mulching: Apply a layer of mulch in late fall to help protect the bulbs from extreme temperatures and maintain even moisture levels. Propagation: Black Spider Lily can be propagated by dividing offsets from mature bulbs during their dormant season. Pests and Diseases: These lilies are relatively resistant to pests and diseases. However. proper spacing and well-draining soil can help prevent issues like bulb rot. Naturalization: Black Spider Lily can be a stunning addition to naturalized areas. where it can spread and create a captivating display. Remember that the foliage of Black Spider Lily appears after the flowers and lasts through the winter. so it's important to choose a suitable location where the dying foliage won't be an eyesore. With proper care and attention to its planting conditions. Blue Spider Lily can reward you with its captivating and unique blooms. adding a touch of mystery and elegance to your garden. 🖤Shop your unique choice now! Let Black Spider Lily add a mysterious and elegant touch to your life. Don't miss out. let Black Spider Lily take you on a splendid journey! 🕊️🌟 📦Package: 1/2/5 Lycoris radiata Bulbs (It depends on the quantity you purchased)
$9.99 - $59.99
-

mysite Higanbana Spider Lily Equinox Flower Bulbs
🌺Bringing Blooms Closer to Your World: We Will Offer Affordable And High-Quality Seeds for You. 💵 Payments Via PayPal® 😍 99.3% of customers Buy 3 get 1 Free or more to share with family or friends ✨Priority is given to delivery after payment ✈ Worldwide Express Shipping Available 🕷️ Welcome to the World of Equinox Flower! Discover the perfect blend of mystery and elegance.Equinox Flower is not just a flower. but the beginning of a story. 🌸✨ 🌷 Product Highlights: Unique Beauty: Each petal exudes a deep color. like pearls in a starry night.Resilient Life: Equinox Flower symbolizes the resilience of life. blooming with a unique glow in the dark.Work of Art: Each bouquet is meticulously designed. presenting an unparalleled visual feast. 🌼 Why Choose Equinox Flower: One of a Kind: A different language of flowers. conveying your distinct taste.Precious Collection: The rare Equinox Flower will become a treasure in your garden.Gift of Choice: Present it to your loved ones. conveying emotions that stand out. Planting Conditions: Sunlight: Equinox Flower thrives in partial to full sun. It prefers a location with direct sunlight in the morning and some shade during the hottest part of the day. Soil: Well-draining soil is crucial to prevent waterlogging. as the bulbs are prone to rot. A slightly acidic to neutral soil pH is ideal. Watering: During its active growing season in spring and fall. keep the soil evenly moist. However. once the foliage dies back. reduce watering to allow the bulbs to rest. Temperature: Equinox Flower is hardy in USDA zones 7 to 10. It requires a period of dormancy during winter. so it's important to provide a cold period for the bulbs. Spacing: When planting bulbs. place them about 6 to 8 inches (15 to 20 cm) apart and at a depth of around 4 to 6 inches (10 to 15 cm). Fertilization: Fertilize the bulbs in early spring before they start actively growing. using a balanced. slow-release fertilizer. Mulching: Apply a layer of mulch in late fall to help protect the bulbs from extreme temperatures and maintain even moisture levels. Propagation: Equinox Flower can be propagated by dividing offsets from mature bulbs during their dormant season. Pests and Diseases: These Equinox Flowers are relatively resistant to pests and diseases. However. proper spacing and well-draining soil can help prevent issues like bulb rot. Naturalization: Equinox Flower can be a stunning addition to naturalized areas. where it can spread and create a captivating display. Remember that the foliage of Equinox Flower appears after the flowers and lasts through the winter. so it's important to choose a suitable location where the dying foliage won't be an eyesore. With proper care and attention to its planting conditions. Equinox Flower can reward you with its captivating and unique blooms. adding a touch of mystery and elegance to your garden. 🖤Shop your unique choice now! Let Equinox Flower add a mysterious and elegant touch to your life. Don't miss out. let Equinox Flower take you on a splendid journey! 🕊️🌟
$9.99 - $59.99


You have seen 48 out of 63 products